


It’s important to have a quality stereo system that provides excellent sound and creates a special atmosphere in your car. However, the factory stereos that cars come with don’t always meet your expectations as a car owner. So you have to look for a better stereo system.
But buying a good stereo system is only one part of the problem. It’s also very important to install your new stereo correctly.
If you’re a car enthusiast with some basic knowledge of electrical engineering, it should be easy for you to do it yourself. If you’re new and want to install your car stereo for the first time, the process can feel a bit overwhelming. But installing a car stereo is not that difficult and the whole process consists of a few simple steps.
A word of caution though. Remember to be very careful when installing car stereo. If done incorrectly, it not only can sound bad, but may also lead to a short circuit.
If you have any doubts or need assistance, feel free to contact one of our experts at Santa Clarita Autosound. Our skilled team will help you quickly and safely install your new car stereo.
In this article, we provide you with step-by-step instructions on how to install a car stereo. You will learn:
- What tools you need for installing a car stereo
- How to remove the car’s factory stereo
- How to wire the new receiver
- How to properly install the new car stereo
- How to test and troubleshoot your car stereo
Understanding the Car Stereo System
But before we get straight into how to install a car stereo, let’s quickly go through the basics of car stereo systems. Plus, there are several types of car stereos, so understanding your device better is a good start.
Components of a Car Stereo System
A standard car stereo system consists of several components. Let’s break it down:
- Head Unit: This is the control panel of your car audio system. It controls the volume, radio stations, playlists, or other sound sources.
- Amplifiers: The amplifier increases the power of audio signals from the head unit to the speakers.
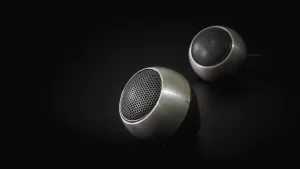
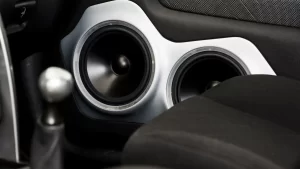
- Speakers: Speakers come in various sizes, shapes, and types.
- Wiring and Cables: Finally, wires and cables to connect everything together.
Of course, this is a simple breakdown and there are much more things to know about car audio systems. If you want to have an even better understanding, read more about car audio.
Different Types of Car Stereos
Car stereo systems come in a variety of models with multiple functionalities. Over time, car audio systems have evolved to provide better sound quality and have new features that enhance the driving experience.
There are stereo systems in two sizes: Single-DIN Stereos (180 × 50 mm) and Double-DIN Stereos (180 × 100 mm). The difference is the size and supported features.
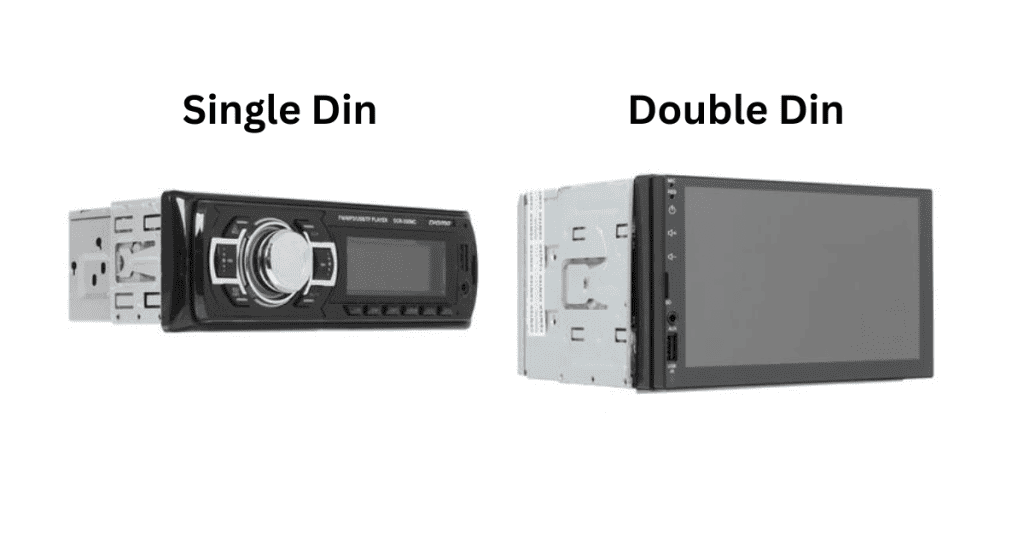
Single DIN Stereos is the most common type of car stereo. It has the basic functionalities like CD playback, radio, auxiliary port (AUX), etc.
Double DIN Stereos are twice as tall as single DIN stereos. They have more advanced features such as touchscreens, navigator, smartphone integration, and more. Many 2-DIN car stereos run Android OS, which can support a navigator, maps, video playback, and also display images from a rear view camera.
It’s important to understand the differences to make a more informed decision when selecting a stereo system. Plus this will help you during the installation process.
Choosing the Right Car Stereo for your Vehicle
Car stereos systems are usually selected individually for each car model so that they fit the dash and also don’t look too out of place and different from the factory one (unless that’s your end goal).
If you’re wondering how to choose the stereo for your car, here are a few things to keep in mind.
The most important thing to consider are the dimensions of your car audio system. You need to select a car stereo that will seamlessly fit into your dash.
As mentioned earlier, car stereos generally come in two sizes, single DIN and double DIN. Double DIN stereos are larger, with more features and often include touch screens while single DIN stereos are smaller and more straightforward.
Another thing to consider is what factory features come with the car stereo and what additional features you may want like USB ports, navigator, and more. Also think about your music preferences—what genre will you listen to the most? What do you want the car stereo to look like? Do you prefer touchscreen controls or knobs?
As a tip, you can make a list of your requirements and personal preferences for the stereo system. This can help guide you in your searches for finding the car stereo that best suits your needs.
There are some other important features to consider when selecting a car stereo and exploring different brands. For more in-depth insights, explore our guide on car stereo selection.
Check our collection of car stereo systems, from high-end touchscreens to budget-friendly options. Explore our shop now and find the perfect car stereo for your vehicle.
Now, we’ll talk about the exact steps and tools you’ll need for a successful car stereo installation.
How to Install a Car Stereo in 5 Steps
The installation process for car stereos of different types and manufacturers is not much different from each other.
The usual process for installing a car stereo system is the following:
- Gather the necessary tools such as screwdrivers, panel removal tools, and wiring materials
- Safely disconnect the car’s negative battery terminal
- Carefully remove the old car stereo by prying off dashboard panels and disconnecting wires
- Install the new car stereo by connecting the wiring harness, mounting and securing it in place
- Finally, test the newly installed stereo system to ensure it works properly. If any issues arise, troubleshoot them or get professional help
Now, let’s dive deep into each step with more detailed instructions.
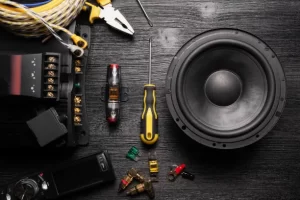
Step 1: Prepare the Tools You’ll Need
What will you need to install a stereo in a car? Not much, in fact.
There are a few basic instruments that are commonly used in almost all installations. To start the installation of the car stereo you will need:
- A couple of screwdrivers and a wrench or socket set for the battery cable
- Wire strippers, electrical tape for making the wiring connections
- Panel removal tool for safely removing the dash panels without scratches or damages
Keep in mind that this isn’t a comprehensive list. It’s always best to check the manual that comes with your new car stereo for detailed instructions.
After having your car stereo at hand and preparing all the necessary tools, you can finally go to the practical part and install the stereo system.
If at any point, you’re unsure about any part in the installation process, don’t hesitate to seek professional technical help.
Step 2: Disconnect the Negative Battery Terminal
Start by turning off your car completely, setting the parking brake and removing the negative cable from the car battery. This is usually a black cable.
Before touching any wires, always disconnect the car’s negative battery terminal first. This is an important safety precaution. It’s crucial to prevent accidentally short circuiting and damages, ensure safety, and reduce the risk of accidental airbag activation.
If you’re unsure how to do this, you can consult your car’s manual for the battery location and disconnection instructions.
Step 3: Remove the Old Stereo
Before we install the new car audio system, we must first deal with the old one. This process can vary greatly depending on the make and model of your vehicle.
Here are three main ways for how your factory stereo might be mounted and how to remove it.
1. Removing the old stereo secured in a metal mounting sleeve by spring clips
To remove the stereo held by spring clips, you’ll need DIN tools. Put them into the holes on each side and listen for the click (that’s the clips releasing). Then gently spread the tools apart and pull the stereo out of the dash. Now, just pull the stereo out of the dash and enjoy the freedom!
2. Removing the old stereo bolted to the dash with brackets
In this case, you’ll need to take off some trim panels from the dashboard to reach the stereo. Carefully pry the plastic trim away, it’s usually held in place with hidden pressure clips. Or find and remove bolts to disassemble other panel parts. After this, you should be able to spot the screws holding the factory stereo to the dash. Simply take out the screws and pull the stereo out.
3. Removing the old stereo mounted to a rail system inside the dash
Certain car manufacturers attach the factory stereo to a guide rail within the dash. After detaching the spring clips or bolts, the stereo can be easily slid off the rail. However, removing this rail may also be necessary if it interferes with the new radio’s chassis. It’s important to note that once this is done, you typically won’t be able to reinstall the factory stereo.
How to Remove Stereo for Older Cars
Stereos for older cars, especially American models made before the early 1980s, often have a “shaft-style” design. To install a shaft-style stereo, you will need to access it from behind the dash. This can be quite challenging due to the wiring, heater controls, and ductwork in the way.
In this case, it’s better to get expert help as such stereos need special attention when installing.
Our team has extensive experience with different types of stereo systems and can assist you. Simply contact us for guidance or hands-on support for car stereo installation.
How to Unplug the Factory Stereo
If your car has or once had a factory stereo or a “stereo prep” package, there should be a plastic wiring harness (at least one) behind the stereo opening. This harness connects the stereo to the vehicle’s electrical system and speakers. Disconnect the factory stereo from the wiring harnesses and unplug the antenna to complete the removal process.
As a general reminder, be careful when taking off the panels and removing any parts to avoid any unnecessary damage. And also keep all the screws and clips in a safe place. You will need these when installing the new car audio system.
Now once the old radio is out of the car, it’s time to install the new stereo. You will need to connect all the wires and then install the stereo into the dash.
Step 4. Installing New Car Stereo
The installation process is the biggest step and involves a few substeps. It may seem intimidating at first, but trust us, with some care and patience, you can handle it.
In this part, you’ll learn how to connect the wires, connect any extra accessories, mount the stereo securely, and put everything back together.
And if you need help for any step in the process, we’re one call away.
How to Wire a Car Stereo
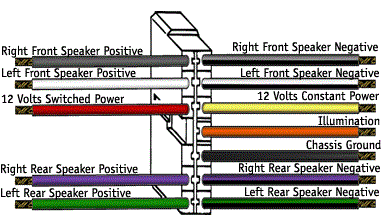
To wire a car stereo, you will need to match the wires of the new car stereo with those of the car. If you have a wiring harness specific to your car, use it to seamlessly connect your new stereo to the factory wiring harnesses.
These harnesses usually come with a color-coded diagram for connecting to a stereo system. Each car stereo also has a specialized wiring diagram that you can usually find in its manual. Simply refer to both diagrams to connect the wire colors correctly.
If there’s no harness available for your vehicle or the factory stereo plug was removed, you’ll need to identify each wire of your car’s stereo and connect them to the corresponding wires of your new stereo.
Check our online shop or contact one of our experts for direct assistance in finding the right harness for your car.
Now, the great part is that you can make these wiring connections on a workbench or table, no need to be inside the car.
It’s important to ensure that wires corresponding to similar functions match up. This usually means pairing colors, such as the yellow wire (battery wire) from the car to the yellow wire from the stereo.
Some general points to remember:
– Red Wire: Connect to the ignition wire that powers the car radio.
– Black Wire: It’s usually the ground wire, connect it to a metal part of the car.
– Blue Wire: Connects to the power antenna or the amplifier in the audio system
– Green, Purple, White, Grey Wires: Usually related to speakers. Refer to your wiring diagram for correct matching.
Continue with this method until all wires are paired and connected.
How to Connect Wires
There are a few ways to connect bare wires. To ensure secure and long-lasting connections, avoid simply taping them together. The tape will eventually dry out and come off, leaving the wires exposed and increasing the risk of shorts.
Here are some more reliable and lasting connection options:
- Soldering. This provides a permanent and professional connection, maximizing current transfer. It’s recommended to insulate the soldered connection with heat-shrink tubing and a heat gun for added protection. Many people prefer this method due to its reliability and conductivity.
- Crimping. It’s a fast and relatively simple method. Make sure to use the right size crimp connector—typical in-dash stereo wires are 18-gauge. But some may have heavier gauge power and ground wires. There are different types of crimp connectors available, such as bullet connectors, butt connectors, or crimp caps.
- Posi-Product. This type of connectors provide a quick and secure twist-on connection for wires. They can even be reused. This is a quick and effective way to achieve strong connections.
Understanding Different Types of Wires
Power wires
When connecting the wiring for your new stereo, it’s usually best to use the wiring harness. However, if you need to make a direct power connection, it’s important to understand the difference between “switched” and “constant” power.
For the main power connection, which is the red wire, you should connect it to a switched power source. This means that the power will only be on when the ignition is keyed. This way, your stereo will turn off when you turn off the car, preventing any unnecessary battery drain.
As for the memory lead, which is usually the yellow wire, it should be connected to a constant power source. This way you won’t lose your radio station presets, tone control presets, and clock settings every time you turn off the vehicle.
Speaker wires
When it comes to the speaker wires, car stereos typically have eight wires for a traditional 4-speaker system. These include positive and negative wires for the front left, front right, rear left, and rear right speakers.
Depending on your vehicle’s wiring configuration and the wiring harness adapter, some of these wires may not be used.
Ground wire
To ensure proper stereo performance and eliminate unwanted noise, a good ground connection is essential. If you’re not using a custom wiring harness, find a bare, unpainted bolt or screw that touches the bare metal of your vehicle’s chassis.
Loosen the bolt, insert the ground wire (usually black), and then tighten the bolt. Without a solid ground connection, your stereo won’t function properly and signal noise can disrupt your music.
Parking brake wire (for in-dash video)
It’s often worth investing in a car backup camera for added safety and ease of parking.
So, if your new stereo has a touchscreen or video monitor, you’ll need to connect a wire to your emergency/parking brake wire. This wire acts as a switch, activating the video monitor when the parking brake is engaged.
The location of the wire can vary depending on your vehicle’s parking brake configuration. In the case of a hand brake between the front seats, you’ll need to remove the center console. If you have a foot-pedal parking brake, you’ll have to route the wire under the dash.
Wiring the parking brake is doable but can be tricky, so if you need any assistance, get in touch with us.
Power wires
Usually, it is best to make all of the new stereo’s wiring connections via the wiring harness. But if you have to make a direct power connection, here’s what you need to know about the difference between “switched” and “constant” power:
- A switched power source is only on when the ignition is keyed. Connect your new stereo’s main (switched) power lead – usually a red wire – to a switched power source, so that the stereo will turn off when you turn off the car, and not drain your vehicle’s battery.
- A constant power source is always on. Connect your new stereo’s memory lead – usually a yellow wire – to a constant power source, so that you don’t lose your radio station presets, tone control presets, and clock settings every time you turn off the vehicle.
Speaker wires
Car stereos have eight wires for the traditional 4-speaker system – a positive wire and a negative wire for the front left, front right, rear left, and rear right speakers. Depending on the wiring configuration in your vehicle and the wiring harness adapter we offer, some of these may not be used.
Ground wire
A good ground connection is vital for proper stereo performance and to eliminate unwanted noise. If you are not using a custom wiring harness, look for a bare, unpainted bolt or screw that contacts the bare metal of your vehicle’s chassis.
Loosen the bolt, slip the ground wire underneath (this is almost always a black wire), then tighten the bolt. If your ground wire doesn’t contact bare metal, your stereo won’t operate. A loose or weak ground connection can result in signal noise interfering with your music.
Connect Additional Stereo Accessories
Depending on your chosen stereo system, you may also have to connect different components to the back of it. These can include the Bluetooth microphone wire, a USB cable, GPS antenna, auxiliary input cable (AUX), and more.
There are many different accessories with which you can additionally upgrade your car audio.
Mount the Car Stereo System Into Dash
Once all of the wiring and connecting is done, it’s time to mount your car stereo unit into the dashboard.
Slide the stereo into the mounting bracket you’ve installed in the dash. Check the fitting and make adjustments if necessary.
You may need a mounting kit for the installation. Follow the instructions provided with the mounting kit if one is needed.
After you are satisfied with the fit, secure the stereo to the bracket by screws or the provided security equipment that comes with the stereo.
Reassemble Dash Panels and Trim
When your new car stereo is now secure, you can reassemble the dash panels back to its usual state. Carefully line up each piece and put it back into place. Once you’ve placed all the panels, you can reconnect the car battery.
As a tip, consider doing a quick check if your stereo system works properly before fully fastening everything. If you get any issues, it’ll be easier to fix them while everything is still exposed.
Step 5. Testing and Troubleshooting
Before we head down the open road, turning up the volume to our favorite songs, it’s crucial to test our newly installed car stereo.
Check if Your Car Stereo Works After Installation
Here’s a simple step-by-step testing procedure to check whether your car stereo works or not.
- Switch on the ignition of your car, but do not start the engine.
- Power on your newly installed car stereo. If it’s working, the stereo lights should come on.
- Check if your car stereo is receiving radio signals. Search and set some local FM channels to ensure the antenna is correctly connected.
- Play your favorite tracks or CDs to make sure the audio quality is as expected and the speakers are functioning correctly.
- Test the equalizer and balance controls. Vary the settings to see if there’s a change in sound output.
- Check sound quality. There should be no wheezing or noise. It’s best to listen to each speaker separately to know if they work as intended.
- Lastly, try connecting to your stereo using Bluetooth, USB or other devices (if you have them). This will verify whether or not your device is compatible.
After going through these steps and ensuring your car stereo works properly, congratulate yourself on a job well done!
Troubleshoot Common Stereo Installation Issues
However, if through testing you discover some issues, don’t worry, it happens. Here are a few common problems and how to address them:
- “Car stereo does not turn on”: Double-check all wires, specifically the power wires. Ensure the connections are snug and secure.
- “Poor radio reception”: Inspect the connection of the antenna cable. A loose connection can cause weak signals.
- “Poor sound quality or no sound”: Examine all speaker wires. They might not have been properly connected or even crossed over, which can lead to no output or distorted sound.
Don’t hesitate to get in touch with one of Santa Clarita Autosound experts if you need any help.
Conclusion
To sum up, while installing a car stereo does take some learning, time and patience, the rewards are worth the effort.
We hope now you have a full understanding of how to install a car stereo and this task doesn’t seem daunting to you. With some dedication and carefulness, you can easily do it on your own.
Now, sit back, turn on the music with your new stereo and enjoy the ride!